Table of contents
Open Table of contents
Hugo 설치
우선, 각 OS 및 Architecture 에 맞게 hugo를 설치합니다. 공식 설치 페이지
저는go install 을 이용해 설치했으나 brew나 package manager를 이용한 설치도 가능하고 직접 binary 파일을 다운받아 설치도 가능합니다.
go install github.com/gohugoio/hugo@latestHugo Site & Theme
hugo version 을 통해 정상 설치 여부를 확인한 후 적당한 디렉터리에 새로운 사이트를 생성합니다.
hugo new site blog --format yaml # Config 파일을 yaml 포맷으로 생성
cd blog
git init
git remote add origin git@github.com:your-name/your-repo.git
hugo themes 페이지에서 마음에 드는 테마를 골라 설치합니다. 저는 blowfish 테마를 선택했습니다.
git submodule add -b main https://github.com/nunocoracao/blowfish.git themes/blowfish
git submodule update --init --recursive
echo "theme: blowfish" >> hugo.yaml
blowfish 설정
blowfish theme은 필요한 설정을 커스터마이징 할 수 있습니다.
자세한 내용은 Configuration - blowfish 에서 확인 가능하며, 필요한 기능이 있으면 추가해서 사용하실 수 있습니다.
아래는 제가 적용한 설정 파일 내용입니다.
mkdir -p config/_default
touch config/_default/{config.yaml,languages.ko.yaml, markup.yaml, menus.yaml, params.yaml}
config.yaml
# config.yaml

defaultContentLanguage: "ko"
enableRobotsTXT: true
pagination:
  pagerSize: 10
outputs:
  home: ["HTML", "RSS", "JSON"]

googleAnalytics: "G-XXXXXXXX" # GA 연동
languages.ko.yaml
# languages.ko.yaml
languageCode: "ko"
languageName: "Korean"
weight: 1

params:
  displayName: "KO"
  isoCode: "ko"
markup.yaml
# markup.yaml
tableOfContents:
  startLevel: 2
  endLevel: 4
  ordered: false
menus.yaml
# menus.yaml
main:
  - name: "Docs"
    pageRef: "docs"
    weight: 10
  - name: "Posts"
    pageRef: "posts"
    weight: 20

  - name: "Github"
    pre: github
    url: "https://github.com/your-name"
    weight: 100
params.yaml
# params.yaml
defaultAppearance: "light" # 사이트 기본 테마
autoSwitchAppearance: true # OS/브라우저 설정 감지
enableSearch: true # 검색 기능

homepage:
  layout: "profile"
  showRecent: true # 최근 글 표시
  showRecentItems: 6 # 최근 글 표시 개수
  showMoreLink: true # 더보기
  showMoreLinkDest: "posts" # 더보기 클릭 시 이동 경로

article:
  showTableOfContents: true # 목차 (TOC) 생성
  showBackToTop: true # BackToTop 설정

mainSections: # Main 화면에 노출할 Sections
  - posts
  - docs

footer:
  showThemeAttribution: false # hugo, blowfish link 삭제

copyright: "© { year } your-name. All Rights Reserved." # Copyright 설정
Content 작성
hugo 명령어를 통해서 content를 생성하거나 직접 생성할 수 있습니다.
# 명령어로 생성
$ hugo new content posts/test.md

# 직접 생성
$ mkdir content/posts
$ touch test.md

# Page Bundle 방식 (동일 디렉터리에 이미지파일 관리 용이)
$ mkdir -p content/posts/test
$ touch content/posts/test/index.md
참고로 직접 생성할 땐 문서 최상단에 Front Matter를 추가해줘야 합니다.
---
date: '2025-07-22T22:24:10+09:00'
draft: true
title: 'Title'
---
CI/CD 스크립트 작성
Cloudflare Workers 가 Repository push 이벤트를 감지하면 wrangler.toml 파일에 설정된 내용을 바탕으로 CI/CD를 수행합니다.
touch wrangler.toml build.sh
chmod +x build.sh
wrangler.toml
# wrangler.toml

name = "your_app"                   # workers 에 생성한 앱 이름
compatibility_date = "2025-07-22"   # Cloudflare의 런타임 기능정책 적용일 기준

[build]
command = "./build.sh"

[assets]
not_found_handling = "404-page"
directory = "./public"
build.sh
# build.sh
#!/usr/bin/env bash

main() {
  HUGO_VERSION=$(curl -s https://api.github.com/repos/gohugoio/hugo/releases/latest | jq -r '.tag_name' | sed 's/^v//')
  export TZ=Asia/Seoul

  echo "✅ Installing Hugo v${HUGO_VERSION}..."
  curl -LJO https://github.com/gohugoio/hugo/releases/download/v${HUGO_VERSION}/hugo_extended_${HUGO_VERSION}_linux-amd64.tar.gz
  tar -xf "hugo_extended_${HUGO_VERSION}_linux-amd64.tar.gz"
  cp hugo /opt/buildhome
  rm LICENSE README.md hugo_extended_${HUGO_VERSION}_linux-amd64.tar.gz

  # Verify installed versions
  echo "✅ Verifying installations..."
  echo Go: "$(go version)"
  echo Hugo: "$(hugo version)"
  echo Node.js: "$(node --version)"

  # Clone themes repository
  echo "✅ Clone Blowfish..."
  git submodule update --init --recursive
  git config core.quotepath false

  # Building the website
  echo "✅ Building the Site..."
  hugo --gc --minify
}

set -euo pipefail
main "$@"
Cloudflare Workers 생성
Workers 생성 및 배포
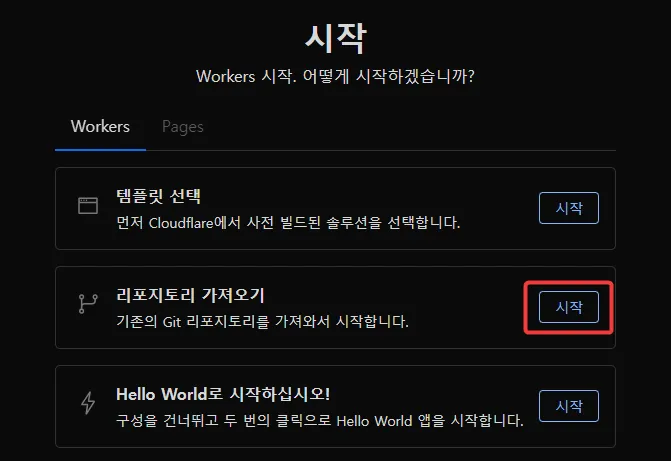
Cloudflare workers 탭으로 이동하여 리포지토리 가져오기로 Github Private Repository를 연결하였습니다.
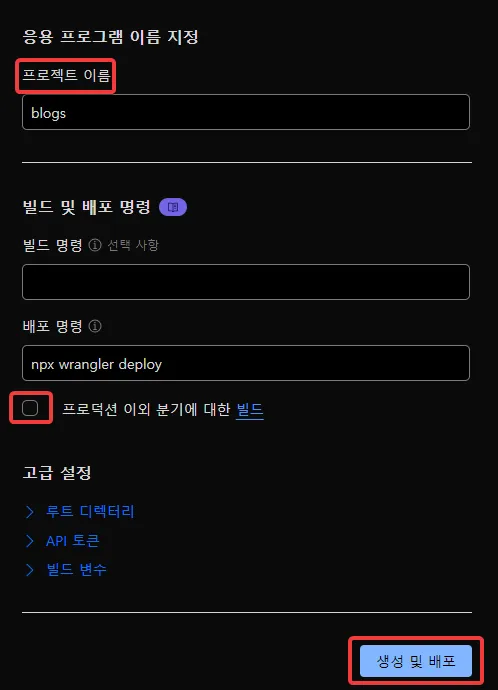
프로젝트 이름을 지정하고 프로덕션 이외 분기에 대한 빌드 체크박스 해제 후 생성 및 배포 버튼을 눌러주세요.
오류 없이 정상 배포 되었다면 Cloudflare 에서 제공하는 도메인으로 접속 시 hugo 블로그가 정상적으로 노출되는 것을 확인할 수 있습니다.
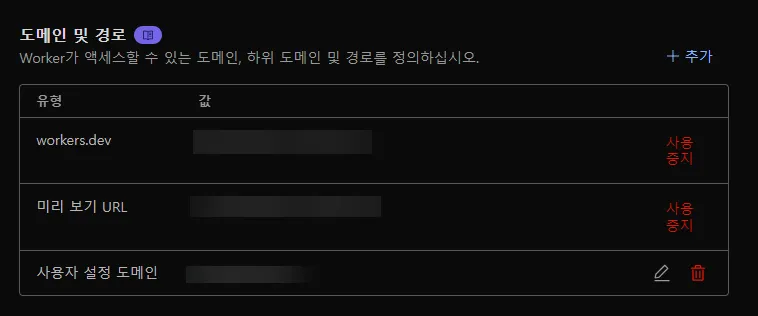
커스텀 도메인 설정
별도로 사용하는 도메인이 있다면 설정에서 사용자 설정 도메인 을 추가할 수 있습니다.